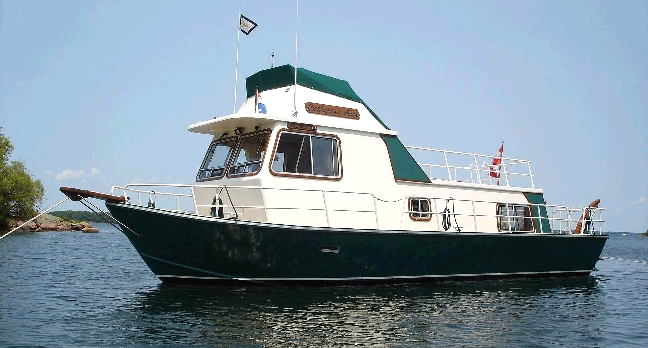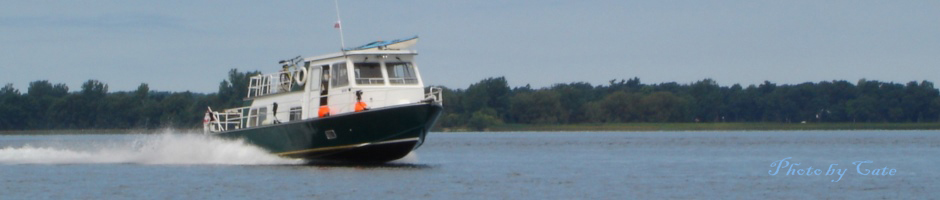
Article by Rob Farrow (rob.farrow@sympatico.ca) based on the 2001 cabin exterior restoration of the 1972 Alwest 370, “Catherine Ann”.
Although most Alcan boats were constructed entirely of welded aluminum, the Alwest version built in the early 1970s has a wooden superstructure sheathed in plywood with a thin gauge aluminum outer layer, originally glued to the plywood. Over the years, water migrates in behind the aluminum and eventually deteriorates the plywood. One of the key problems is the rubber molding cupped around the lower edge along the deck. This molding quite effectively collects water running down the outside and holds it to be wicked back up into the plywood inside.
On the brighter side, one of the things often missed in considering the value of an Alwest, is the superior quality of the Beclawat windows (www.Beclawat.com). These are of a quality usually found only on commercial vessels. All the seals and run channels are replaceable and original materials are still available from the manufacturer who is now located in Belleville Ontario. The reason that I mention this, is that since you have to remove the windows to replace the exterior cabin sheathing, now is also the time to rebuild your windows.
The following information will lead you through one method by which deterioration of the superstructure can be completely and permanently solved, adding many years to the life of your Alwest. The material which I chose, to replace the cabin exterior sheathing, is a readily available product primarily used for sign making. It is an exterior grade plywood with a resin impregnated fiber sheet as the top layer, sold by the brand name “Crezon” (www.olypanel.com/sign_making). For joining, bonding and fairing I use West System Epoxy products (www.westsystem.com). There are other materials which could be used, but these are what worked for me.
The renovation described here was completed in the winter of 2000/2001 and shows no deterioration to date. Since completing this project, the main bilge of the boat has been completely dry. Prior to this, the bilge always had some amount of water in it, except during extended dry spells. I now realize that this was rain water coming down through the walls, obviously making everything wet, on its way to the bilge.
This is not a “one weekend project” but is well within the capability of a reasonably skilled amateur with commonly available hand tools. The project is also possible over a winter, with covered but unheated storage, since only the final steps need epoxy and paint which are dependent on warmer temperatures. As a reference for the skills and time required, if you can finish a basement, including the drywall, you can likely do this project. Including some rewiring while the walls were open, I completed this project over about 10 late Fall and early Spring weekends. So the “ballpark” time requirement for this project is about 150 hours. In between, I rebuilt the windows at home in the workshop.
First, the sail panels and rear corner vent structures need to be removed. If these are still originals, add them to your list of “new things to build at home” over the winter. The gutter strips along the edges of the aft cabin roof (and handrails along the sides if you still have them) also need to be removed. Also navigation lights, and anything else attached to the exterior of the superstructure.
The next step is to remove the windows. Getting rid of the old sheathing and eventually preparing and painting the new exterior is going to be a dirty and at times dusty process. You will want to protect the interior of the boat as much as possible. Since the windows will be out for most of this process, I started by removing the interior window trim rings and using these as patterns to cut temporary window closeouts from ¼” plywood. I could likely have used plastic sheeting, but during the fitting of the new sheathing, these covers will need to individually come on and off a few times, so this proved to be an easy and inexpensive solution. They also provide a little more “security” for the interior of the boat during the renovation process. The covers were screwed to the inside, close to the edges of the opening where the holes will be covered when the trim rings are reinstalled.

The windows have to be removed as complete assemblies, as there is no way to remove the glass first. The frames are not screwed or bolted to the structure, but are secured by the clamping force of the interior trim rings (already removed) thus they are now held in place only by the caulking. The tough part is getting the removal of each window started. Don’t pry too heavily on the exterior aluminum flange as you will bend the edge and ruin the finish. Push and pry from the inside, and once you get one corner started the rest will come quite easily. For the larger windows, this is a two person job.
The frames are light, but the tempered glass is heavier than you might think. Start with the smaller windows to get a feel for this process.
The door and its frame are removed following a similar process. With the end stops, sail panel and interior door handle removed, you can slide the door out of the track before removing the frame.
After the windows and door are removed, close up the openings, from the inside, with the plywood covers. I made a hinged “door” in the aft window cover so that I could still access the interior of the boat.
Next, a circular saw, carefully set to the correct depth, is run along the roof edges, cutting the sheathing flush with the overhang. This needs to be carefully done so as not to damage the underside of the overhang. I chose to leave the original sheathing in place across the top of the front windows since it was solid and removal is complicated by the roof overhang and the windshield wiper motors.
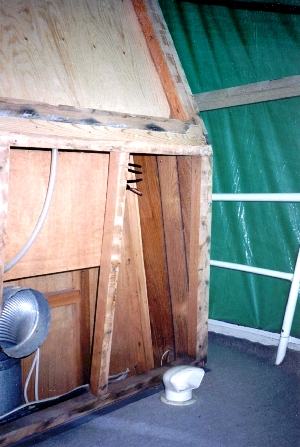
Now comes the dirty part . . . . . all the plywood and aluminum sheathing has to be pulled away. The original plywood was fastened to the frame with glue and construction staples. The circular saw set to the depth of the sheathing can be used to cut it into more manageable pieces, but be careful with a jig saw or anything that would significantly cut into the frames or sever internal wires. On Catherine Ann, the lower third of the plywood was mush. The middle third came away easily. The top third was still bonded as securely as the day it was built and had to be separated carefully so as not to loosen the frames and do damage to the interior paneling on the other side.
You are now looking at the Sitka spruce 2 x 2 frames. (some new frame sections are already installed in these pictures)
 |
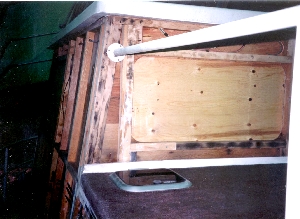 |
If your boat is like Catherine Ann, things are not as bad as they will initially look. In many places, the surface of the frame is blackened, and perhaps slightly deteriorated, but a surface cleanup with a coarse sanding disc to remove all of the old glue and poking with an awl, should show that most is still structurally sound and will hold new fasteners. There will be places where the frame has deteriorated significantly. Unless it has completely rotted away, removing the old frame pieces will be difficult to do without damaging the interior paneling. Since the end result will remain completely dry, I chose to sister new frames alongside any that were suspect but were not easily removable. I used clear cedar for the new frames since Sitka spruce was all but impossible to find. (In hindsight, to do this again I would use ash for the new frames)
Now is the time to make sure that none of the vertical frames are bowed. This is particularly important to the aft of the sliding door. On Catherine Ann, I fastened a temporary piece of steel flatbar along the side of the frame as a sanding/planing guide and in conjunction with a horizontal straight edge, used a power hand plane and a coarse sanding disc to bring everything flush. In a couple of places, where the wall was bowed in, I sistered a straight new frame permanently alongside the bowed one.
This is an ideal time to run new wires for outlets, sound systems or whatever, with the exterior of the walls wide open.
One additional improvement . . . . the Alwest has a bilge vent through the exterior cabin wall behind the shower enclosure. I installed a 5 inch square 12 volt exhaust fan (surplus computer fan which draws a fraction of an amp) to power this ventilation and it is amazing what a difference this has made in removing any bilge odour from the boat on those hot summer nights.
For the new sheathing, I used 11 mm Crezon plywood as described earlier. The original plywood was 3/8 (9.5 mm) plus the original thin gauge aluminum and glue (about 1.5 mm), thus 11 mm is just about right. Retaining the original total wall thickness is important for a correct fit of the window frames.
Before installation of the new exterior panels, I sealed the lower edges with 3 coats of West System epoxy, thickened slightly with West 404 filler.
Remembering the previous problems with water being wicked up into the plywood, I chose to install the new sheathing with a 1/4” gap to the aluminum deck. The transition from the aluminum hull to the wooden wall frames is a couple of inches above the deck inside the wall, so there is no chance for water to enter the boat through this 1/4 “ gap.
I chose to fasten the Crezon plywood to the frames using 1 1/2” coated deck screws. You could use stainless steel but since these screws will be completely sealed within the final structure, this is an unnecessary expense. Also, the thread design of deck screws is superior to standard wood screws for biting into the spruce framing. Even if the outer surface of the frame is less than perfect, the 1 1/2” screw length will reach solid wood without coming through the inside. The screw holes should be predrilled through the plywood only, with a countersink bit so that there is no bulging of the Crezon exterior surface. (Mark where the wires run, and don’t put the screws there J) The head of the screw needs to be about 1/16” to 1/8” below the surface to allow for a solid epoxy fairing (to come later).
As each section of sheathing is positioned with a couple of screws, the window opening is traced from the inside, the sheathing removed and the window opening cut. There is an important additional step here. The Beclawat windows are designed to clamp a very specific total wall thickness. You may need to cut a slight rabbet around the outside of the opening (using a router) to prepare exactly the right total wall thickness for reinstallation of the windows.
Installing the sheathing and joining the edges is very much like doing drywall but with higher tech materials. You do have to wait for at least +100 C temperatures for the epoxy to cure properly (the warmer it is, the faster this will go). A 3” wide by 1/8” deep (approx) concave is created along each seam with a coarse sanding disc in a 4” grinder. A strip of fiberglass cloth set in epoxy joins the seam and it is then faired flush with epoxy thickened with West 407 filler. Similarly, the countersunk screws are faired with this same material. Seams along the roof edges will eventually be caulked with a flexible material to allow for different rates of expansion.
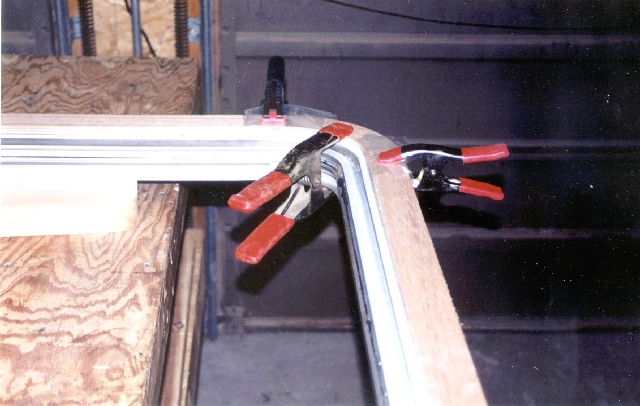
The forward corners of the cabin present a unique problem. I chose to round them substantially, and this has worked out well. The outer corner of the corner frame was chiseled away and the edges of the adjacent sheathing were beveled much as the other joints. Several layers of cloth and epoxy were used to shape the radiused corners. The final layer of filler was applied with a simple tool, made from a piece of 1/8” plywood, to provide a uniform radius.
The windows can now be reinstalled. If the rabbet cut to reach the proper wall thickness extends beyond the window frame, this can be filled and faired with epoxy. I chose to make mahogany trim rings to cover this joint. With the windows at home in my workshop, this was also the ideal time to accomplish this additional project.
All that’s left now is priming and painting and your Alwest 370 is as good as (or perhaps better than) new. The net result should be as apparently seamless as the superstructure on Catherine Ann. (2006 picture of the 2001 renovation)